
Sally and her Dad's Canoe
History
Sally's canoe was given to her father, John Roberts (born in 1920) in the early 1930s as a gift from his family, Putman/Roberts, and it was second hand! Below is a picture of Sally's dad and his friend as young teenagers taking off on a canoe trip. They would begin on Lac-McGregor to Du Barrage to Lac Grand, Lac McArthur to Blanche river and into Lac Saint Pierre...he also paddled the Gatineau river and the logging camps along the Gatineau. The lumberjack men would invite the youngsters for a breakfast of pancakes. Sally's father went on so many canoe trips...another one started in Ottawa...on the canal...Ottawa river/Gatineau river to Blanche river to Lac McGregor. The canoe has survived being turned into a sailboat by Sally's sister (she made the sail from an old sheet)...gunnel bobbing by her kids and lots of camping and portaging.


Restoration
For being close to 100 years old, this canoe is in great shape and has been well maintained. I started by removing the gunwales, bow and stern brass stem bands, and keel. I will leave the skin on for now and use the top of the canoe as a table while I sand gunwales. Knowing the history of this canoe and the adventures it has seen over the decades helps me appreciate the worn lines where paddle strokes have grazed the gunwales.


One on my favourite parts of canoe restoration is removing the canvas skin to reveal the cedar hull. I love tracing my hands along the curves of the wood. If I try to imaginine what perfection physically feels like, this would be it. I can see where old planks were replaced with new boards and again I think about the trips, people, and landscapes this old canoe has witnessed.


Once exposed and looking at the wood, I can see evidence of past refabrications. Tiny pinholes dot their way along the gunwales where the canvas was stapled to the sides and stems of the canoe. I will fill these with wood glue to ensure water doesn't intrude and make any damage to the wood. Once dried, I coated with Tung Oil to protect the wood base.


In order to get the tension needed for the canvas to snuggle tight onto the canoe, I raised the height of my sawhorses by 16 inches. I am using a come-along system to pull the canvas tight onto the canoe shell. From here I can pull the canvas down over the canoe sides and tack it. I used a staple gun on the ends to hold the fabric in place while I secured it with brass tacks. Then I removed the staples (they will rust and so need to be taken out).


I love every part of this process. With the canvas hugging the shell I can now finish the ends. Using fabric pliers I slowly pull the canvas around the bow and stern and tack into place. I love this process because it is deliberate and satisfying to feel the canvas form to the curves of the boat.


Once covered, I burned off the fuzz from the canvas and washed it down. This does three things: 1. smooths the canvas for filling, 2. tightens the skin to the shell of the canoe, 3. wipes the grime off the canvas and prepares it for the filling.


Applying the filler is a bit intimidating for me because it sets quickly and I need to make sure there are no lines or bumps. keeping focus is a challenge as I tend to get sidetracked fairly easily. This is a good lesson for patience. I tend to rush through things but I can't do that with this process. Slow consistent application of filler is needed here.
The Keel seems daunting but in reality is a fairly straightforward process. The key is to think about how to keep water and dirt from getting between the keel and the hull- if you can seal that, no problem.


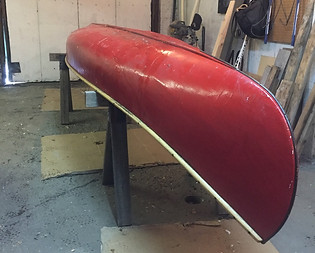
I am painting Sally's canoe Fire Engine Red. This seems to be a choice of colour for most of the wood/canvas canoes I've seen. Since Sally's canoe has been recanvased a few times, I am not sure if red was the original colour but if I was to bet, I would put $5 on red.
Replacing the gunwales and stem bands brings me to the final section of the canoe recanvasing. These are tricky parts because I have covered the original screw holes so when I replace the pieces I have to make sure the pieces align the right way. I am happy with the look but always a bit nervous to make sure it fits properly.
The wooden plugs I bought to cover the screw holes in the gunwales wont work because the counter sink isn't deep enough. I want to make sure water and dirt don't get into these holes because it will rot the wood- so I've decided to cover them in a clear marine grade silicone sealant (the same I use for the stem band screws).

November 13
December 27

